Indian candles. "Finnish candle" - a safe, long-lasting fire: how to light it and how to cook with it Indian candle how to make
When hiking or traveling as a “savage”, on a picnic or fishing, there is always the question of preparing hot food. Someone makes a big fire, someone drags a primus stove or a packet of dry fuel with them.
I want to introduce you to one old method, or rather a device, with the help of which you can cook food, heat yourself, or illuminate your way. According to legend, it was borrowed from the North American Indians by the colonialists of Christopher Columbus. That is why it got the name “Indian candle”.
The principle of operation of the Indian candle is extremely simple. As in a samovar, combustion occurs in the firebox, and the draft is provided by a pipe. A sort of mini-oven. But in an Indian candle, the role of both the firebox and the pipe is played by the fuel itself - a log that is hollow inside. The inner walls of the log itself are burning.
From my travel experience, I can safely say that an Indian candle is one of the most effective and cheapest ways to prepare hot food.
Anyone can make an Indian candle in a few minutes.
To make it, you need to take any log with a diameter of 10 cm or more. Up to 30-40 cm. Preferably without knots, so that it can be split fairly evenly. The type of wood does not matter much, but it should be remembered that resinous trees “shoot” and give off a lot of sparks. It is not recommended to use a Christmas tree or pine candle for heating. Birch burns hot and does not shoot, but its flame is strong and you need to be careful. In addition, birch bark contains a lot of tar and the flame smokes a little, especially at the end of combustion. An almost perfect candle is made from well-dried aspen. It burns extremely evenly, the flame is light and colorless.
In any case, it is good to use dead wood (but not rotten wood). Otherwise, the candle or its preparation will have to dry for a long time.
So, we cut a piece 15-40 cm long from a log. If you plan to use a candle for cooking, then it is better to take short but thick pieces. Then it will be possible to place the dishes directly on the candle, and it will stand stably on the base. If lighting is important, then it is better to take a longer and thinner piece. To make it comfortable to wear. And if heating is required, then you need to take a thick and long piece. This candle can burn for many hours.

1. The log is split lengthwise approximately in the middle. This is why it is important to use a part of the log without knots. They are very easy to split. If you come across a hollow log, this is generally an ideal option! This is a ready-made Indian candle; you just need to cut it into pieces 20-30 cm long and clean out the rotten insides of the hollow.
Using a hatchet, the core of the tree is cut down so that a channel with a diameter of 5-7 cm is subsequently formed.
2. Both halves are folded again and fastened together in any way. For example, wire, adhesive tape, nails, glue... Thus we got a wooden pipe. It is important to ensure minimal gaps at the junction of the halves. Otherwise, it is through these cracks that the candle will quickly burn out.

3. To light a candle, a little birch bark (birch bark) is stuffed into the pipe. At the same time, make sure that the free passage of air through the pipe is not blocked, otherwise there will be no draft. If there is no birch bark, you can use several splinters. The spark plug itself is installed so that there is a small gap at its lower end for air to enter. For example, on stones or a couple of logs.
4. The birch bark is set on fire and pushed with a splinter inside the pipe approximately to its center. If it is at the top of the pipe, the candle will burn for a long time, but with a weak flame. This mode is good for heating or warming up small amounts of food. And if you push the birch bark almost to the very bottom (or light the candle from below), then the candle will burn faster, but the flame will be strong. This mode is good for cooking or lighting.

5. When a candle burns, it is enough to simply regulate the flame strength by blocking the access of air from below the candle (for example, with earth or snow). For cooking, a flame height of 10-15 cm is sufficient.
6. The candle can be used as a torch. Wood is an excellent heat insulator, and even a very burning candle can be held freely by hand, lighting your way, or you can install several of these torches to illuminate a tourist camp.

7. To heat food, keep it hot or for heating, it is important to be able to switch the candle to intense smoldering mode. In this case, the candle smolders from the inside with virtually no flame. At the same time, quite hot smoke comes out of it. This is achieved by blocking the air from below the spark plug.
8. It only takes a few minutes to heat up, for example, a can of canned food even in winter. It is enough to place the jar on the candle so that there is a small gap for the smoke to escape. If you need to cook food in a pan, then place it on a couple of wood chips - spacers, like on a gas stove burner. If there is a cauldron, it is simply suspended above the candle at a height of 5-10 cm.
Sometimes, to allow air to enter and gases to escape, appropriate cuts are simply made at the ends of the candle. But this is only possible for candles with a diameter of 20-25 cm or more. Tall and thin candles are not stable and are not worth the risk.
When using a candle as a heater in a tent, care must be taken to remove combustion products.
And completely proper heating looks something like this. A burning candle is left outside. A short metal pipe is suspended above it at an angle. The higher end of the pipe is inserted into the tent. The candle heats the pipe and, accordingly, the air in it, which enters the tent. This way the tent is heated with hot, but fresh, clean air, not smoke.
Once a candle is lit, it is not necessary to burn it to the end, until it dies. As soon as the food is cooked, the candle is extinguished by blocking the air from both below and above. For example, by covering it with some non-flammable object such as a pot lid or throwing a damp cloth over it. Thus, with the help of one Indian candle you can cook food several times.
Of course, such a candle is much heavier than a primus or a packet of dry fuel. But dry fuel is quite expensive. And unlike a primus stove, which must be carried on both ends of the trip, and also fiddle with a stinking canister of fuel for it, a candle has a one-way ticket. It dies, providing us with hot food, warmth and light.
But when traveling by car or other motorized vehicles through wild, and especially treeless and mountainous places, a candle will serve you faithfully. Spend a little time making it and you will always be full and warm.
Anyone who loves outdoor recreation (especially not a picnic, but an active one - hunting, fishing, hiking) knows how important a properly built fire is. If you don’t carry a barbecue with you, you need to worry about safety so that you don’t have to run away from a forest fire and feel like a criminal. And lighting a fire in the snow, so that it doesn’t go out every minute, seems to many to be the pinnacle of fire-making skill. However, experienced travelers know how to build a fireplace in a fire-safe manner so that it burns for a long time, does not go out even in slush, and does not require regular feeding. Everyone calls it differently: Finnish candle, taiga candle, Indian or Swedish, but the essence remains the same. There are even several ways to make it.
Maxi-bonfire
The Finnish candle is most successful if you “land” not far from sawn logs. No effort is required: select three saw cuts of approximately the same height and diameter, place them in a circle close to each other and light a fire in the middle. In order for the fire to burn evenly and the burnout to be the same in all directions, you need to choose the logs wisely in height. The Finnish candle lasts the longest; the logs should be twice their diameter. The power of such a fire is enough to boil a five-liter boiler in a third of an hour, and you don’t even need to hang it - it will rest on the logs themselves. As the logs burn, they seem to form into a hut. If you need a Finnish candle fire for a long time, at this stage you can maintain it as usual, by adding firewood.

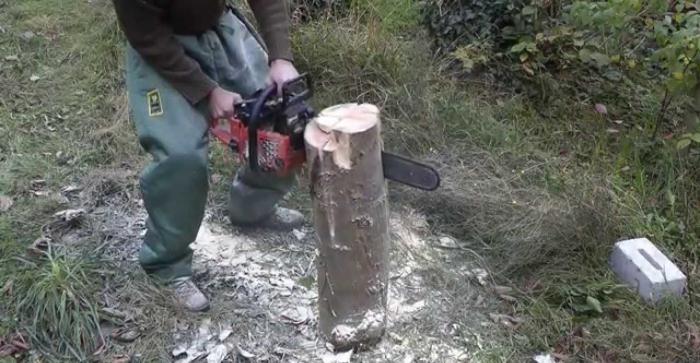
If you have a chainsaw
If there is no need for such a large hearth and the presence of an appropriate tool on your hands, you can do otherwise. A piece of thick log half a meter long is taken and sawed crosswise (not all the way, about three-quarters of the length). If the diameter of the cut is large, you can work with the chainsaw a little more to get eight “slices”. You should not make more cuts, because the narrower the sector, the faster your Finnish candle will burn out. The log is firmly fixed to the ground (you can dig it in or support it with stones), kindling is placed inside (from sawdust, or just liquid ignition) - and for several hours the fire is at your service.
Field method
Suppose there is no saw, but do you need a Finnish one in this case? Well, there is an ax in nature anyway. The log of wood chosen for this purpose is split like regular firewood, only a little more diligently so that the logs do not vary too much in thickness. Then they gather into the original log, only around a thick branch - this will be the hearth. Below, closer to the ground, and approximately in the middle, the Finnish candle is tied, preferably with wire - it will definitely not burn out. But if you don’t have it, twine, fishing line, and flexible rods will do. It is especially important to tighten it securely at the bottom, since in the middle the logs will burn out faster, and without good fixation near the ground, your fire will fall apart. The central branch is pulled out three-quarters from below and sawed off, after which the Finnish candle is placed on the ground. By the way, if the original log is not too massive, you can use this branch as a leg and simply stick it into the ground.

Hand candle
If there is no nearby (either a suitable dry object for sawing, or a saw or even a normal ax), then the Finnish one is made a little differently. Quite thick poles, at least five centimeters in diameter, are collected around the area and gathered into a bunch, again around the center branch. The side of the poles that will be inside needs to be cut a little with a knife - it will work better. The rest of the manipulations are the same as when creating a “finca” from logs.
Primus candle
It is used specifically as a stove for cooking food. The main points are the same as when making a fire-candle using the field method. There are two nuances:
- The original log must be partially hollowed out from the inside. Alternatively, you can not plan the core, but split it into logs and peel them. Such a fire is assembled in the snow using the same method, around a branch, but the cavity inside must be made artificially, and the outer walls are closed, if possible, without cracks.
- On two opposite sides, the logs are either trimmed less or pushed upward more, by five to six centimeters. Due to this design, the fire in the center will be fanned by air, and its tongues will be directed predominantly upward.
Such a Finnish candle is not suitable for heating - the fire is all concentrated inside. But the food cooks much faster.

What can a Finnish candle be useful for?
In addition to cooking and heating (except for the Primus stove), such a fire is simply irreplaceable as a beacon. Experienced fishermen who go out at dawn leave it on the shore as a signal for those who are late - in the dark it can be seen from afar.
It is very convenient when using Finnish candles that almost until they completely burn out, they can be moved from place to place without difficulty and without causing burns. The long-lasting nature of the fire can be considered a significant advantage: a medium-sized log provides light and heat for about four hours. And a maxi-fire without additional fuel can perform its functions all night long.
If you are not a fan of “wild” tourism and fishing, but like to celebrate the New Year at the dacha, Finnish candles placed along the paths will bring romance and decorate the garden no worse than garlands and Chinese lanterns.
Let us immediately clarify that in this article with a video on how to make an Indian candle, we will talk about a relatively wide class of fires for cooking in the forest.
These fires have different names (Indian, Indian, Swedish, Finnish candle, etc.), but they all have one thing in common: a survival candle is a bunch of split firewood from one log, tied into a whole, with a flat top surface on which the kettle is placed , saucepan and other utensils. The most common names are “Indian” and “Finnish candle”.

First look at how to make one of the most common types of taiga candles.
The video below (at the end of the article) presents the results of testing different options for making candles from wooden logs. They will help you find the optimal design, taking into account certain requirements.
Comments on the video. The simplest taiga candle is made from three logs, which are installed next to each other. The optimal height is 2 log diameters. Advantages of a candle made from three logs: ease of manufacture, high flame, stability, performance.
The second variety is a log split into, for example, 4 parts. Advantages: intense combustion, high flame. Disadvantage: instability of the structure during rapid combustion.
Bonfire Primus
The log is split into pieces, the core is hollowed out, the pieces are tied together with wire so that two opposite logs stick out in the upper part, and the rest are located below. Such a platform with a gap allows the flame to escape when a pot or kettle is placed on it. From below, an air flow is created accordingly. Advantages: intense combustion, high flame concentration, ability to be moved from place to place. Disadvantage: a candle tied with wire does not provide heat to warm hands, dry clothes, etc.
The fourth version of the taiga candle
The block of wood is not cut to the ground with a chainsaw into 4 or more parts. To light such a candle, you usually need to pour a little lighter fluid or gasoline or machine oil inside. Advantages: bright strong flame, stability, can be used for camp lighting.
Look at these types of taiga candle fires and the combustion test. Watch until the end to find out which candle is the best.
If you are not satisfied with the need to build wooden devices for cooking every time, look at how they can help in this matter.
This device, with the help of which you can both cook food and heat yourself or illuminate your way, according to legend, was seen and borrowed from North American Indians by the colonizers of Christopher Columbus. That is why it got the name “Indian candle”, and now it is also called “wooden primus stove”, “Swedish fire”, “Finnish candle”, etc.
Same as in the photo, diameter 8 cm and length 10 cm, is being manufactured for 15-20 minutes, “works” for 30-35 minutes and, due to its good efficiency, allows you to boil up to 2.5 liters of water. In general, in such small sizes this product is controversial and “not for everyone.” Much more effective are “candles” with a diameter of 12 cm and a length of 18 cm. However, in this case, the dimensions were chosen based on the fact that only a Victorinox knife was available; it would have been possible for them to make something larger, but somewhat difficult. It is better to use a saw and knife.
The type of wood from which this “wooden primus” will be made is not particularly important, but it should be remembered that, for example, spruce or pine “shoot” and give off a lot of sparks, so using such a “candle” for heating will not be very convenient and comfortable. Birch burns well and hot, does not “shoot”, but its flame smokes a little, especially at the end of combustion. Dry aspen, which burns with an even and colorless flame, is most suitable. In any case, when making an “Indian candle,” you should use, if possible, as dry as possible, but not rotten wood.
The external proportions of the “candle” depend on the intended use - for example, for cooking, a short but thick one is most suitable, for lighting - a long and thin one, so that it is comfortable to wear, but for heating - a thick and long one, it will burn for several hours.
The process of making a “wooden primus stove” is very simple. We saw off the workpiece to the required length.
We split the round timber in half and then the halves in half again. I would like to note that it is not at all necessary to split the workpiece into four parts, the fewer cracks there are, the later the “candle” will burn out along these cracks, however, cutting out the core from the other halves of the workpiece is more tedious and more difficult than cutting off the corners of the quarters.

Cut out the core and make notches to make it look like this.

We firmly connect the quarters with wire.

We ensure that they fit together as tightly as possible, and fill the middle with small pieces of birch bark, splinters or sawdust left over from planing so that the free passage of air through the channel is not blocked, otherwise there will be no traction. There is an option to use wet ropes and laces coated in clay instead of wire.

If possible, the “candle” should be placed on stones or logs so that there is a small gap at its lower end for air access. If not, then you should cut out a small side air duct in the lower part of the workpiece in advance.
Let's light it, it should be taken into account that if the main source of fire is concentrated in the upper part of the "candle" channel, then it will burn for a long time, but with a weak flame, and if you light the "candle" from below, then it will burn faster, but the flame will be strong. The process of kindling itself requires some skill and practice, each time it will turn out faster and faster.

The flame strength of a “wooden primus stove” can be easily adjusted by shutting off the air supply from below. For cooking, a flame height of 8-10 cm is sufficient. When using a “candle” as a torch, you can hold it in your hand, even if it is burning strongly; wood is a good heat insulator.

When the access of air from the bottom of the “candle” is completely blocked, it goes into intense smoldering mode, which is convenient for heating ready-made but cooled food. In addition, the “candle” does not have to be burned out from beginning to end; as soon as there is no longer a need for it, it is simply extinguished by blocking the access of air from below and above at the same time.
But for example, the same “wooden primus stove”, but made in larger sizes.

Gradually burning out, the “Indian candle” begins to collapse, so it is important not to miss the moment.
Reading time ≈ 3 minutes
A Finnish candle is a kind of mini-bonfire made from a small stump or a piece of log. It is used for cooking in a boiler and heating water. It can be a good replacement for a regular fire during evening gatherings in nature. You can make a Finnish candle with your own hands in just 20 minutes; the burning time is about half an hour.
Features of the manufacture and use of Finnish candles
To prepare a Finnish (Swedish, Indian) candle you will need a small stump or block. The easy-to-make device can be used for lighting and even for short-term decoration of open areas. Tourists most often use it as a portable light source or for cooking. It takes a little time to create a candle, but the duration of burning and the heat generated from it are optimal for preparing porridge or boiling water on a hike.
Features of preparing a mini-fire
Preliminary preparation will allow you to conveniently saw a block of wood: in its center you need to drill a hole with a diameter of about 2-3 cm.

The same procedure must be carried out with a stump or log of larger size and weight. A stick is inserted into the hole on the main block (can be replaced with a branch). A log with large parameters is strung onto an installed stick. Such a counterweight will allow you to make a candle carefully and safely. After connecting the logs and placing them on the sawhorse for sawing firewood, work is carried out according to the following instructions:
1. The log is cut crosswise using an electric or gasoline saw. The depth of the cut should be no more than 2/3 of the height of the entire block.


2. Using a regular lit candle, cover the side parts and the bottom of the cut with paraffin (or wax).

3. Cut a small strip of paper (newspaper can be used) with a length 4-5 cm greater than the cutting depth. It is folded in half, then unfolded, and paraffin shavings are poured over the fold. It is important to consider that the layer should be made large, but so that the paper then easily rolls up and the paraffin itself does not spill out.

4. The paper with paraffin is wrapped lengthwise. And with the help of a pencil, a thick knitting needle or a screwdriver, it is pushed into the cross-shaped cut. It is important to carry out the procedure carefully so as not to damage the paper or spill paraffin. 4-5 cm of paper with paraffin should remain above the log.

5. The resulting wick is fixed with molten paraffin. To do this, you need to light a regular candle and pour a melting compound where the wick joins the wood. At this stage, the Finnish candle will be completely ready.

To get a burning log, the performer only needs to set fire to the manufactured wick. Thanks to the presence of paraffin inside, the log will burn more slowly and the temperature will be maintained. You can make a Finnish candle with your own hands in just 15-20 minutes. If the performer does not have an electric or gasoline saw, then the cuts should be made manually. The made mini-bonfire can be used on hikes (it is important to consider the weight of the candle) or for home camping.